Sunday, August 30, 2015

Ohio Star Block

Since posting the hourglass or Quarter Square Triangle (QST) block last week, I've been looking for ways to use it. Today, I tried an Ohio Star block.


I pulled out some 7" squares from the piles that I cut a couple of weeks ago.


I made the QSTs as shown here: Hourglass Blocks


The Ohio Star is a 9-patch block made of 4 QSTs, 4 plain background blocks, and one plain square in the center to match the print of the QSTs. You can see the layout below.


Putting them together is just like any other 9-patch. Pay attention to the orientation, so your stars will emerge.


Here's another.


This is a fun block to make. Give it a try! I'm looking forward to making more to combine in a scrappy quilt.

Tuesday, August 25, 2015

Hourglass Blocks

I've been cutting scraps like mad! Today, I thought I'd see what size hourglass blocks made from 7" squares would be since I have cut so many of them.


I've seen this technique, but I'd never tried it. It begins with HSTs (Half Square Triangles). Make these as usual by pairing two squares, drawing a diagonal line, stitching on both sides of the line with a .25" seam, and cutting on the drawn line.


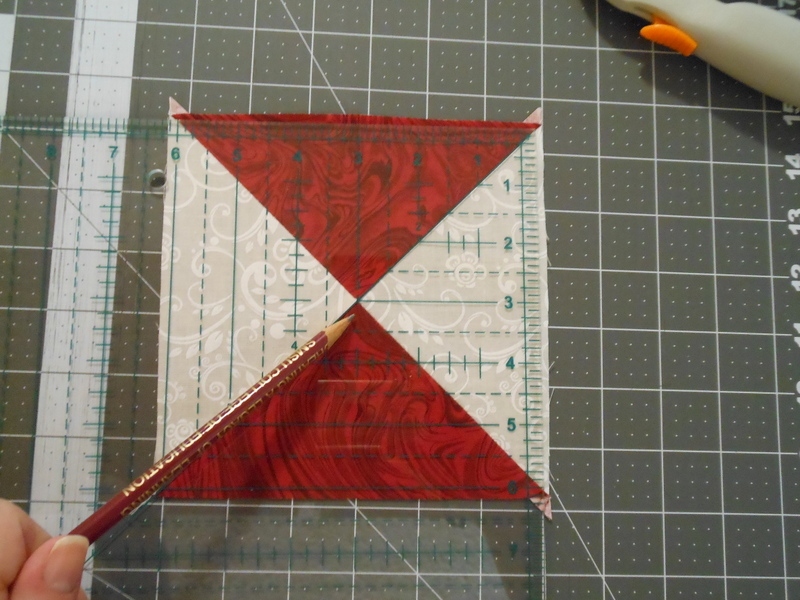
Next, you pair your HSTs as shown below. With right sides together, place one HST atop another. The seams will line up and nest, because you are putting contrasting colors together. In this picture, my bottom HST has the red on the upper half, and the top HST has the red on the lower half.


Draw another diagonal line and stitch on both sides of it, just as you did before.


Make sure your seams line up. I placed a pin in the middle, to keep the seams nested.


After stitching, cut on the drawn line and press the block open.


Congratulations! You now have two hourglass blocks.


 Mine measured approximately 6.25", so I trimmed them to 6" to make sure they were square. I lined up my diagonal line on the ruler with the diagonal of the square. Note that I place the ruler so the 3" mark was exactly at the center where the triangles meet.


You can arrange the blocks in different ways:


I wanted to see them in combination with some four-patch blocks, so I made a few with 3.25" strips.


Here are a couple of different layouts:


Sorry about the blurriness of this picture!


In the top layout, the four-patches are each surrounded by four matching triangles. In the second, the four-patches are surrounded by two different colors of triangles.


I'm not yet sure how I will put these together, but I did find out the size of the hourglass block made from 7" squares which was what I set out to do in the beginning. Sometimes, you just have to experiment to find your answers. :)

Saturday, August 15, 2015

Cutting Up Scraps

Sometimes, when I am between projects, I like to cut up scraps into the sizes I use the most. Doing this creates order out of a chaos of leftover fabrics. Storage of the cut pieces is more efficient for me. Plus, there is the added benefit of having one step already done when it is time to start a new scrappy project.


This is the result of today's session.


Many systems for cutting scraps exist--one that many people follow is Bonnie Hunter's. You can find her ideas here: http://quiltville.com/scrapusersystem.shtml

Another good system is found in the book Scrap Therapy by Joan Ford.


I find that these systems, while full of great ideas, don't really address the sizes that I use most, so I cut 7" squares, 5" squares, 3.5" squares and leftover strips for string quilts.


  • I use 7" squares when making HSTs--they are 6.5" after trimming, so four of them sewn together create a 12.5" square--a very common size of quilt block. 
  • The 5" squares can be used in charm square patterns or can be used to create 4.5" HSTs. 
  • The HSTs created from 3.5" squares can be trimmed to 2.5"--another very common unit in quilt patterns.
  • Leftover differing width strips are great for string quilts.


These are the sizes that work best for me--you may find others that better fit your quilting style. Some people prefer to wait and cut as they create quilts, but for me, the organizational benefit of cutting my scraps is important--I like order!


Wednesday, August 12, 2015

Calico Sunny Lanes

The Sunny Lanes block is a traditional block. The basic unit looks like this:


When the blocks are put together, they form diamonds among the patches.


This diagram and the one of the block above it are from Quilter's Cache--a wonderful resource for quilters.


When I began my Sunny Lanes, I went about the construction a bit differently. I have a big pile of 16-patch blocks I made when a friend gave me a bunch of 3.5" squares (over 2700 3.5" squares!).


 I wanted to use those in the quilt, so rather than making the block the traditional way, I used my 16-patches and constructed the chevron blocks from HSTs.


I chose to use a calico for the "lanes" in these chevron blocks rather than the usual solid color. I think it creates a more old-fashioned look.


This is a quilt where layout is very important. I checked back with the diagram many times to be sure that my diamonds were formed correctly. The assembly itself is easy--just sew the 16-patch and chevron blocks together.


This is before quilting.


I used a pretty, neutral fabric for backing. One reason I chose it is because it has a large repeat, and I wanted to show off the print. Cutting it up too much would cause me to lose the overall pattern. I used a red binding to bring out the reds in the quilt.


Here is the finished quilt.


Taking a different route in construction is something you may sometimes need to try. Don't be afraid to make your quilt your way.

Friday, August 7, 2015

Warm Wishes For A Football Fan

My husband asked for a quilt for watching football this season. I decided to go with the Warm Wishes pattern. You can find the link to download this free pattern here:Warm Wishes

This is a very simple and very adaptable pattern. It is made up of only two blocks: a rail fence (block made with strips) and a plain block of your focus fabric. I say it is adaptable because you can make the blocks any size, so if you have a focus fabric with a large pattern, you can use it without cutting it up too much.


To begin, decide what size you want for the blocks. You will make the rail fence blocks first. They are made of three strips. I made mine with two 2.5" gold strips and one 3.5" burgundy strip.


You can use three different colors if you like. Make the strip sets all the same (the colors in the same order), so that when you put them together, you get the interesting "frame" effect. You can also vary the widths if you want to emphasize particular fabrics.


Making the strip sets is easy; simply sew the strips of fabric together on the long side to create a pieced strip of fabric. Press your strip set and measure the width. Mine was 7.5", so I sub-cut the strip sets at that same measurement to create square blocks. Your sub-cuts will depend upon the width of your strip set--if you have used wider strips, your set might be 9" wide--in this case, you would sub-cut your strip set into 9" pieces. The key is that you want square blocks after cutting.


Using this same measurement, you can now cut your focus fabric into squares that will be the same size as the rail fence (three strip) blocks. I cut mine at 7.5".


Putting the blocks together is easy. Each horizontal row will alternate a focus fabric square and a rail fence square. As you look at the photo below, notice that the rail fence blocks change orientation with each horizontal row. In this example, Row 1 has horizontal rail fence blocks; row 2 has vertical ones. This creates a "frame" around some of the focus fabric blocks.


I used more of the team fabric for the backing, and I used a black binding to set off the colors.


Ready for kickoff!

Wednesday, August 5, 2015

RIP Mr. Batting

I buy my batting by the roll. Because I needed to clean out and sort the closet where I keep the roll, we had a visitor in our living room this spring:


Eventually he made it into the closet where he belonged. He was a generous guy--he gave and gave.


This morning, I am sad to say, he came to an end:


 RIP Mr. Batting--you were a great guy--warm, soft, and generous.


PS--New guy on order!

Monday, August 3, 2015

Inspiration From Another Quilter

I Want To Do That!

As quilters, we often see pictures of lovely quilts and think, "I want to do that." That is exactly what happened to me when I saw this quilt:


http://www.quiltingboard.com/pictures-f5/finished-another-scrappy-today-t265737.html#post7209654
My thanks to Jeanann S. for allowing me to use the picture of this beauty.
Click the photograaph to follow the link to Jeanann's original photograph.


Notice how the illusion of circles pop out of this quilt. I tried and tried to figure out why--looking at colors, values, arrangements, etc.--but I could never really determine the reason.

What to do? Make one of my own and see what happens!


If you look at the pattern for the blocks, it is essentially a shoo fly--a nine patch that includes corner HSTs.

Since I'm a stockpiler :), I had the elements on hand:


Each block needs four HSTs of matching fabrics and 5 squares of prints. I used 4.5" squares.


The pieces go together as any nine-patch, but pay attention to the orientation of the HSTs--they form a kind of frame for the block.


After sewing the blocks together, I looked eagerly for the circle illusion.


I couldn't see the circles at all until I took a photograph. They are there, but they don't jump out as much as those in the original. It could be because my squares are a different size, or it could be something completely separate from the quilt itself--lighting or photographic quality, for instance.

As Jeanann did in her original, I added a border that finished up the quarter-square triangle pieces at the edges--I think the quilt looks more complete that way.


I like the quilt, even though I didn't get the result I was looking for. I like the strong colors in contrast to the white.


I used a "cheater cloth" (pre-printed quilt fabric) as a backing. This way, both sides are pretty!


Many thanks to Jeanann S. for the inspiration and for the permission to use her photograph. Next time you see a picture of a quilt and have the "I want to do that" thought, give it a try!