Showing posts with label Sunny Lanes. Show all posts

Thursday, July 22, 2021

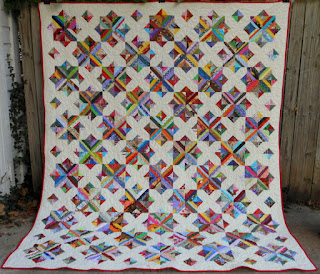
String Carpenter's Star

If you have read my blog (or just looked at the pictures!) you know that I delight in string blocks. This is my latest string project.

String Carpenter's Star (82" x 82")

Carpenter's Star (sometimes called Carpenter's Wheel) is a traditional pattern, and layout charts are available in many places online (the one I used is HERE), but I substituted string blocks for the regular color or print blocks.

I drew it on EQ8, so I could get an idea of what I would need.

EQ8 Plan--I did change the four corners to string blocks rather than the plain ones shown.

I can never get an adequate look at the variety of strings in my blocks with the program, but it did help with my numbers and placement for the blocks.

The blocks finish at 4", the quilt is a combination of full string blocks, HSTs of strings and background, and plain background blocks. (I did use rectangles of background fabric as a kind of border around the center part instead of using a bunch of plain background blocks sewn together.)

String Carpenter's star (center detail)

It took me a bit of time to assemble. I started with the center and built it outwards; this way I could see the pattern coming together as I went--trying to do it row-by-row didn't fit in my brain!

String Carpenter's Star (backing and binding detail)

I found a piece of 108" backing in my stash. With all the seams in the top, I thought a one piece backing would be easier to quilt. Quilting is not my strong suit, so it is stitched in the ditch between blocks; I also stitched just inside the edges of the zigzagging string blocks.

I am happy with the result. I've always wanted to try this pattern; I think it makes a beautiful quilt. In substituting the string blocks, I made it a little different from the norm. This substitution can work in many projects.


In this one, I used the Arkansas Crossroads pattern.
String Crossroads


This one is Stringy Lanes which uses the Sunny Lanes pattern.

Stringy Lanes


Here is a Bear Paw with string blocks.

Bear Paw

The possibilities are limitless. If you enjoy string blocks, be on the lookout for non-traditional ways that you can use them.

Happy Quilting! 😸


Thursday, January 10, 2019

Stringy Lanes

I decided to make another traditional pattern but with the addition of string blocks.

I made a Sunny Lanes pattern in the past using calico in place of the usually solid "lane" fabric. My post about that quilt can be found HERE.

Calico Sunny Lanes

This time, I replaced the four-patch blocks with string blocks.

Stringy Lanes 74" x 94"

This is a larger quilt than the first, and I'm not really happy with how the lanes at the edges worked. Next time, I need to take a bit more time in the planning stage, to create a more symmetrical pattern.

I do, however, love the colors and fun fabrics.

Stringy Lanes (detail)

Stringy Lanes (detail) Two little monkey faces

Stringy Lanes (detail) Nutcrackers and chocolates

Stringy Lanes (detail) Inspector Clouseau and a chicken


Stringy Lanes (back and binding detail)


This was a fun project. It is easy to replace traditional blocks with string blocks to make a new variation on an old favorite.


I'm almost finished with the top of my Good Fortune quilt (Bonnie K. Hunter's Mystery). I'll have pictures soon.

Happy quilting!

Wednesday, August 12, 2015

Calico Sunny Lanes

The Sunny Lanes block is a traditional block. The basic unit looks like this:


When the blocks are put together, they form diamonds among the patches.


This diagram and the one of the block above it are from Quilter's Cache--a wonderful resource for quilters.


When I began my Sunny Lanes, I went about the construction a bit differently. I have a big pile of 16-patch blocks I made when a friend gave me a bunch of 3.5" squares (over 2700 3.5" squares!).


 I wanted to use those in the quilt, so rather than making the block the traditional way, I used my 16-patches and constructed the chevron blocks from HSTs.


I chose to use a calico for the "lanes" in these chevron blocks rather than the usual solid color. I think it creates a more old-fashioned look.


This is a quilt where layout is very important. I checked back with the diagram many times to be sure that my diamonds were formed correctly. The assembly itself is easy--just sew the 16-patch and chevron blocks together.


This is before quilting.


I used a pretty, neutral fabric for backing. One reason I chose it is because it has a large repeat, and I wanted to show off the print. Cutting it up too much would cause me to lose the overall pattern. I used a red binding to bring out the reds in the quilt.


Here is the finished quilt.


Taking a different route in construction is something you may sometimes need to try. Don't be afraid to make your quilt your way.