Showing posts with label Binding. Show all posts

Wednesday, May 3, 2023

Donation Quilts

 I finished a new crop of quilts for donation.

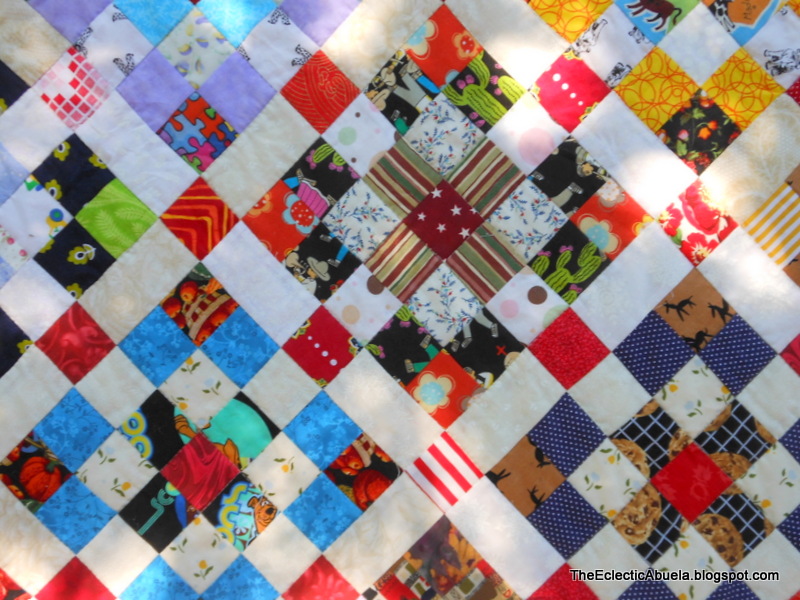
Four Donation Quilts (3@ 60' x '72" and 1 @ 60" x 78")


I make these using 3.5" squares as Leaders and Enders. When I get a bunch (usually a couple of times each year), I put them together, and voila!--I have quilts that I sewed between the pieces of other projects.

Here are four I put together recently. As I assembled them, it was fun to see squares from scraps of fabric I used in other quilts in the past year. The squares are arranged randomly, and I used leftover binding pieces to make scrappy bindings. I apologize for the picture quality--I took them in dappled sunshine because that's what I had! 😎


This time, I had some fabrics given to me by friends or that I had in scrap boxes to put together for the backings. It was fun to combine these things into pieces large enough to back the quilts.

Donation Quilt (backing detail)

Donation Quilt (backing detail)

Donation Quilt (backing detail)

Donation Quilt (backing detail)

I had panels, pillow panels, borders, scrap fabric, cheater cloth, even a draught excluder panel from the UK (this was actually printed on the selvage--in the US, we sometimes call them door snakes). I love jigsaw puzzles, so I had fun deciding how to fit them together, and I think the unusual backings will be a nice surprise for the recipients.


I donate my quilts to Abilities First--an agency that assists individuals with developmental disabilities. You can find their website HERE.

A big thanks to the friends who gave me fabrics for backing these quilts. I tried to put them to good use.


Happy Quilting! 😸


Saturday, August 27, 2022

Maymont

Maymont--A Bonnie Hunter design--80" x 92"


Earlier this summer, I began Maymont, a design by Bonnie Hunter. That post is HERE.

This quilt is a hodge-podge of fun fabrics.

Maymont (fabric detail)


Maymont (fabric detail)


Maymont (fabric detail)

 I had so much fun re-visiting some of these fabrics! They make an overall impression, but when you look more closely there is much to find.

I backed it with a favorite floral--to me, these look like the painted roses in Alice. I was fortunate to have a binding fabric that complemented the backing--the shades of color are almost identical!

Maymont (backing and binding detail)

Unlike the original pattern, I used reds for all the cornerstones to bring a bit of control to my crazy riot of scraps.

This is a great pattern. Thanks, Bonnie!

Happy Quilting! 😸


Tuesday, August 9, 2022

Balloon Baby

 A new grandniece--a new quilt!


This is a bright and happy flannel D9P (quick and easy). 🎈🎈🎈


Balloon Baby 42" x 42"


Balloon Baby (back and binding detail)

I used a scrappy binding for this one, and I succeeded in my aim to use almost every bit of this fabric. I've just a few inches left; they will find their way into something scrappy in the future.

Welcome to the world, baby girl!

Happy Quilting! 😸


Saturday, January 30, 2021

Tom's Big-Boy Quilt

 I like to make a flannel baby quilt for additions to the family.

Here is my grand-nephew's baby quilt.

Safari Baby


Once kids get big enough for a bed (rather than a crib), I like to make them a big-boy or big-girl quilt.

This big-boy quilt started with the backing--I wanted to use this Thomas (as in Tank Engine) fabric since my grand-nephew's name is Thomas.


I didn't know how I wanted to do the front, but the RR crossing sign gave me the idea to use Xs.

Tom's Big-Boy Quilt   64" x 84"

I used some novelty fabrics in it for a bit of I-Spy fun.

Tom's Big-Boy Quilt (detail)

Tom's Big-Boy Quilt (detail)

Tom's Big-Boy Quilt (detail)

Tom's Big-Boy Quilt (detail)

I finished it with a striped binding which I love (though it made me dizzy to cut it out!).

Tom's Big-Boy Quilt (backing and binding detail)

This was a fun project, and I enjoyed making it.

Happy Quilting!


Friday, November 13, 2020

Floral Trip Around the World

 I just love this pattern!

Floral Trip Around the World 90" x 100"

Floral Trip Around the World (back and binding detail)


I made this quilt once before with a travel theme. This time I used florals and a range of solid colors. It was another quilt that requires careful planning and organization, but it was fun to make!

I used a cheater fabric for the back to continue the floral idea, then I added a striped binding to finish. It is brighter than it looks in the photo--I took the photo on a cloudy day.

Happy Quilting!


Sunday, July 8, 2018

Strings and Furrows

Yet another string quilt! I do love them.

This one is a simple arrangement of string blocks and alternating white/beige HSTs that create furrows across the quilt.


I pieced the back from scrap 5" squares, and I used the trimmings from the back to make the binding.


I love the look of the scrappy binding, but with all those seams (thick!thick!thick!), it took me quite a while to hand sew it down to the back!


I love all the things you can find in a scrappy quilt.

A fox and a hedgehog

Scooby Doo!


Pastas and valentines

Vegetable names, sock monkeys, and ruby slippers


I'm still sewing lots of string blocks, so there will be more string quilts to come!

I'm linking with Jo's Country Junction String ChallengeFiber Tuesday 164 at The Quilting Room with Mel, and Whoop Whoop Friday at Confessions of a Fabric Addict.


Tuesday, October 24, 2017

Kaffe Fassett and QSTs

I combined large blocks of Kaffe Fassett fabrics with very subtle Quarter Square Triangles (QSTs) in this quilt for my stepdaughter. I didn't have a pattern for this one--I just made alternate blocks that I thought would be complementary to the prints.


The KF fabrics reminded me of vintage sheet prints.


Since the prints are quite bold, I toned them down a bit by using QSTs as alternate blocks.


The color difference is very subtle (almost too subtle, I think), but the QSTs are white and creme.


I used a small print for the backing and a purple blender for the binding. Many of the fabric prints contained some purple, so I think the color combination worked well.


The quilt finished at 82" x 82". I quilted it on my DSM with a simple meandering pattern.


I told my husband that the prints reminded me of vintage sheets. He said he had never thought of sheets as vintage before, but that he really liked the sheets we had on the bed now. I told him that since I got them new in the 1970s and have used them ever since, they certainly qualify as vintage!

I'm linking with Fiber Tuesday 133 at the Quilting Room with Mel.

Monday, April 18, 2016

Gift Quilt=No Posts!

I've been working on a gift quilt, so I haven't been able to post pictures of my work this week.


During the time I had between steps, I pulled fabric for a donation quilt. My only thought was "cheerful." Here are the pressed FQs.


I used a pattern I'd been wanting to try, "Easy Peasy" from Cool Cat Creations. (Here's a LINK to their Etsy shop.)  Got the top together, but I haven't decided on a backing yet. So . . .  to be continued . . .


I also made binding for three quilts I have to finish. Check out those fancy-dancy binding holders. Hey--they work!


I'm back to the gift quilt--only the binding to finish now!

I'm linking with Fiber Tuesday 56 at the Quilting Room with Mel.

Monday, January 25, 2016

From Limbo to Finished!

Last post, I told you about the quilt in limbo--this week, I finished it!

It is a simple string quilt with a scrappy patchwork back--not fancy, but colorful!


2.5" white strips in center of blocks and 2.5" white sashing and border


7" Squares for a patchwork back


With the trimmings from the back, I made scrappy binding.


A close-up of some of the fun fabrics I used.

Very glad to have this one done--it is too pretty to remain unfinished!


Stash report:

In this month--0 yards
Out this month--16 yards

I'm linking with Patchwork Times for the stash report.


Tuesday, June 16, 2015

Hotpads

This is a quick, easy project ideal for gifts or for your own use. These can be used as potholders, hotpads, candle mats--really any situation where you wish to protect a surface from heat.

You will need a protective thermal material (I use Insul-Bright), batting or flannel, and the decorative fabric you want for the outside. You will also need a dinner plate, a pen, scissors, a sewing machine, and an iron.


Cut Your Materials


As I mentioned above, I use Insul-Bright as my thermal layer. I'm sure other brands are available, but I've always had good luck with this one. It has a reflective layer in the middle to prevent heat from coming through the pad.


I am not affliliated with the company that makes this.


You are going to cut five circles for each pad:


One of your thermal material,

Draw around the plate. You can use a smaller plate if you want a smaller hotpad, though it can be more difficult to bind the smaller size.


Cut out with scissors.


Two of cotton batting (or cotton flannel),


And two of your decorative fabric.

These may be the same fabric, or you may choose two different ones.


 Layer Your Hotpad


First, place one of your decorative fabrics on a surface, right side down.


Second, add a layer of batting.


Third is your thermal layer.


Fourth, a second layer of batting.


Finally, add your second layer of decorative fabric, right side up.


You can pin or clip these together as you like.

On the right, you can see that I have already prepared my binding strips.


Quilt


You can quilt these with a straight line grid or with free motion quilting (FMQ). I used FMQ because these small items give me a low-pressure chance to practice the technique.


Here are my quilted pads.


Bind Your Hotpads


I use binding cut at 2.5" wide. I then press it in half, so I have a double layer.

To determine the length you will need, multiply the diameter of your pad by π (3.14):

in my case, 10.5" x π = 32.97",

so one width-of-fabric strip (about 40") will be plenty with a little left over. You may cut bias strips if you wish, but I've done them both ways, and I found no advantage to bias over straight grain strips.


Sew the binding around the hotpad, easing it around the curves. Dont rush; this isn't hard, but it does take time. Join the ends as you would any binding.


Here is one with binding attached:


I promise it won't have a ruffle when you are done!


Trim your seam to reduce bulk.


Now, turn the binding toward the back side,


and stitch it down. You can do this with your sewing machine, or as I do, by hand.


EDITED TO ADD:

Recently, I've been adding hanging loops to these.


Easy to do--just use about 5" of your binding to make a double-fold strip and layer it in when you sew on the binding.


I made several of these in one day; the project lends itself to an assembly-line process. Here are my results:


Most of these are double-sided. Here they are flipped over:


If you decide to do double-sided ones, be sure to choose a binding color that works with both sides.

You may wish to press these with steam when you are done to ensure they lie completely flat.