Showing posts with label Red/Pink. Show all posts

Tuesday, August 5, 2025

 I had a couple of finishes this week.


First is the latest Bonnie Hunter mystery, Old Town. I changed the colors a little, but otherwise followed her instructions.

Old Town, a Bonnie Hunter mystery 78" x 78"

Old Town (back and binding detail)

I also finished a string hourglass. No pattern on this one, I just needed to use some of my many strings!

String Hourglass 60" x 85"

String Hourglass (back and binding detail)

I'm working on a couple more. Then, I hope to get back to my Sunflower One-Block Wonder.

Happy Quilting! 😸


Saturday, April 8, 2023

Log Cabin Finishes

I finally finished up my Log Cabin quilts. They are fun to make, and I have plans for more!

First, a very traditional brown/neutral one.

Brown Log Cabin 95" x 95"


Brown Log Cabin (center detail)


Brown Log Cabin (detail)

Brown Log Cabin (detail)


Brown Log Cabin (back and binding detail)

For this quilt I used 1.5" strips (finished at 1"). The center red square is a constant fabric which I also used as binding. The back is a brown paint stroke print with a center panel of fruit and foliage (you can just see it in the backing detail picture). I quilted it with straight lines.


The second is a curved Log Cabin in red and white.

Curved Log Cabin (67" x 88")


Curved Log Cabin (detail)


Curved Log Cabin (back and binding detail)

This one was made with 2.5" red (and white on red) strips and 1.5" white (and red on white) strips. The center is a constant, and I also used it for binding. The back is a red/white check. I started the light side of these blocks with plain white strips to make sure the contrast in the center was strong. Again, I quilted it with straight lines.

I enjoyed making both of these. The red (2.5") strips seemed very wide--I may adjust them a bit if I do another curved Log Cabin block. I really love the brown one--I think the colors turned out well.

I have another Log Cabin in progress. This one is in the Courthouse Steps variation, and it is VERY scrappy. I have plans for several more as well, so you will be seeing more Cabin construction from me!


Happy Quilting! 😸


Saturday, August 27, 2022

Maymont

Maymont--A Bonnie Hunter design--80" x 92"


Earlier this summer, I began Maymont, a design by Bonnie Hunter. That post is HERE.

This quilt is a hodge-podge of fun fabrics.

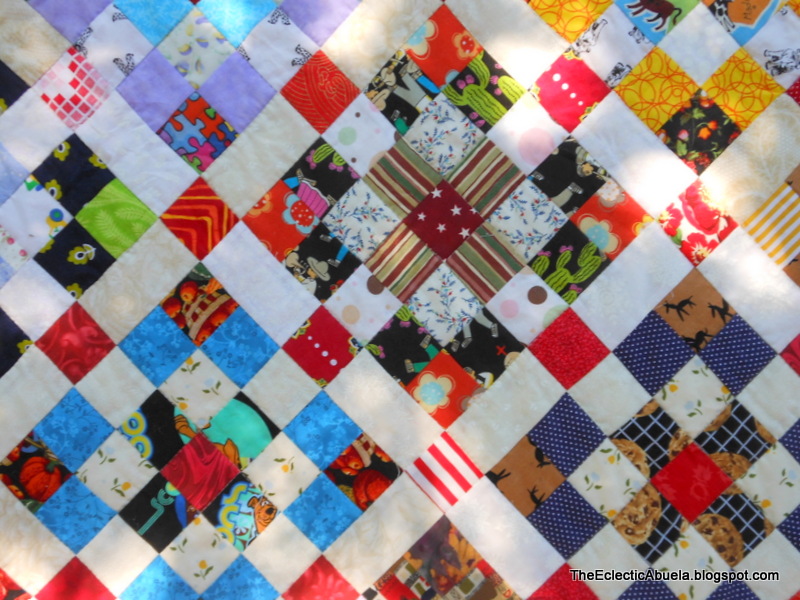
Maymont (fabric detail)


Maymont (fabric detail)


Maymont (fabric detail)

 I had so much fun re-visiting some of these fabrics! They make an overall impression, but when you look more closely there is much to find.

I backed it with a favorite floral--to me, these look like the painted roses in Alice. I was fortunate to have a binding fabric that complemented the backing--the shades of color are almost identical!

Maymont (backing and binding detail)

Unlike the original pattern, I used reds for all the cornerstones to bring a bit of control to my crazy riot of scraps.

This is a great pattern. Thanks, Bonnie!

Happy Quilting! 😸


Sunday, June 5, 2022

A Start on Maymont

 Maymont is a Bonnie Hunter design. I've just started it as a new project.

Maymont by Bonnie Hunter

So far, I've only made a couple of test blocks from scraps I had lying about, but I'm sewing strips now! :)  I'm planning to make all the centers and cornerstones in red fabrics. 

More to come . . .

Test Blocks for Maymont

Happy Quilting! 😸


Monday, December 6, 2021

It's Mystery Time Again

Every year, I look forward to Bonnie Hunter's Mystery quilt which begins the day after Thanksgiving here in the US. It is fun to quilt along with so many others from around the world.

I've completed Clues 1 and 2 of this year's mystery--Rhododendron Trail.

Rhododendron Trail (Clues 1 and 2)


I'm looking forward to seeing how this mystery comes together. 

If you would like to participate, it is easy! Simply visit Bonnie's blog and click on the Rhododendron Trail tab at the top. All the instructions will be posted there each Friday. There is no need to sign up anywhere, and the mystery is free. Be aware that when the mystery is done, the instructions will be removed, so save them to your computer as you go.

Happy Quilting! 😸


Saturday, March 20, 2021

Grassy Creek [AKA October Picnic] is Complete!

 Every year, I enjoy creating a version of Bonnie Hunter's mystery quilt. This year, her quilt was called Grassy Creek.

Grassy Creek [AKA October Picnic]  (98" x 98")

I used Bonnie's colors of red, orange, gold, and grey; however, I substituted blue for her green. I call this October Picnic because this was my color inspiration photo and the palette I created.


The quilt went together well, thanks to Bonnie's excellent writing of instructions. You can see some of the steps I took by clicking on the "Grassy Creek" label on the right pane of this blog.


I added a few bits of color to the grey string border to echo the colors in the quilt.

Grassy Creek [AKA October Picnic] (border detail)

I sent the top and backing to my friend, Leah, who then worked her quilting magic! I am thankful for her fine work.

I tried to capture the quilting, but it is hard to see. I altered the red backing color a bit as I manipulated shadows and highlights of the photo.


I used a grey striped binding to finish the quilt.

Grassy Creek [AKA October Picnic] (backing and binding detail)

And, of course, I had to throw in a Waldo. 😊

Waldo sighting!

I used many fun fabrics in this one--there is a lot to look at.

Some Dalmatians


Frogs and Snowpeople

 This quilt is heavy! A large quilt, small pieces, and string blocks make for a hefty project (another reason I was so happy that Leah quilted this--I dreaded trying to wrestle it through my DSM!). 😉


All in all, I am very happy with the outcome of this mystery quilt. Thanks for the fun, Bonnie, and I look forward to this year's mystery.

Grassy Creek [AKA October Picnic

Happy National Quilting Day! 😸


Monday, December 14, 2020

Grassy Creek--Part 3

 So far, I'm keeping up with the clues in Bonnie Hunter's Grassy Creek mystery.


Haven't trimmed the dog ears yet!

It is a lot of fun, and it is not too late to start!


Tuesday, February 26, 2019

A VERY Full Post

I've been sewing, but I fell behind on my photography, so hold on to your hats--lots of stuff in this post! 😲

First up are two flannel scrap quilts for donation. I wrote about this process HERE and showed my first results HERE.

48" x 62"

Lots of kids' prints

Back and binding (detail)


I have two more nearly done--they are a bit larger at 62" x 74", and they are not made with kids' prints. (I hesitate to say they are made with adult prints--that sounds a bit risque! 😮) I'll post when I finish them.


Next is a mystery quilt. I've posted quilts before made from mysteries engineered by a friend on a forum I visit. (You can see some HERE.) The instructions for this one were designed to make it scrappy, but I've been wanting to use a blue fabric I had in stash, so I went with a more limited color palette.

78" x 78"

Three fabrics (detail)

Back and binding (detail)

I had it pieced for quite a while, but I couldn't decide when I wanted a border on it or not, so the quilt sat in time-out for a bit! I finally pulled it out and finished it. I quilted with straight-line quilting.


Finally, I have finished Bonnie Hunter's mystery quilt--Good Fortune. I have done several post about the steps in making this. (If you look in the "Labels" section on the right-hand side of the blog page, click on "Good Fortune," and they will appear on one page for you.)

Good Fortune 74" x 74"

Good Fortune (binding and backing detail)

Wide variety of fabrics (detail)

Even more fabrics! (detail)

A bunny, a goose, kids, peppermints, etc. (detail)

This was a fun project to piece. I substituted yellow/gold for the orange in the original instructions, but all the other colors were the same as the original. The quilting was difficult. For some reason, I kept shredding thread (I think it was the abundance of seams!), and it took a long time to complete. I'm not really happy with the quilting, but as the saying goes, "Finished is better than perfect."


I'm trying to get things finished up before Spring Break because I have a new pattern I want to try... 😏


Wednesday, December 19, 2018

A Lovely Gift

An anonymous lady, on a Facebook group to which I belong, worked through the administrator of the site to do a Santa Angel giveaway leading up to Christmas. She said she had fabric and other things that she wanted to share. My name was one of those drawn, and I received the package today.

Pretty Pinks!

 A big Thank You to the Santa Angel. Happy Holidays!

Sunday, July 29, 2018

Stars on Strings--An Original Design

This quilt began on graph paper. I have an EQ program, but I was defeated by triangles!

Stars on Strings--66" x 88"


I tried this more than once. My first experiment was to use regular, brightly-colored strings.


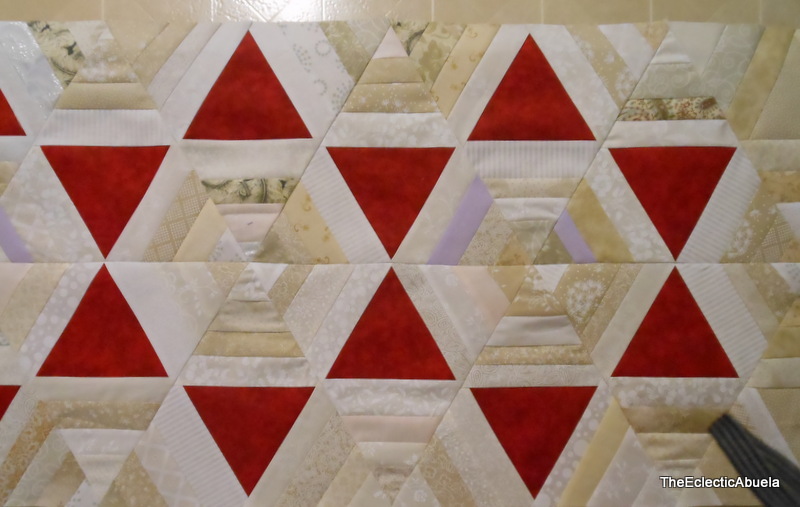
As you can see, the red stars are lost amidst the chaos!


I went to neutral strings which worked better to show off the stars.

Please forgive the camera strap in the corner!

 I stayed with this idea, though, for me, it was hard--I always want MORE COLOR!


The making wasn't too hard, though 60 degree triangles can be tricky to assemble. It was simple string piecing for the blocks.

8.5" paper foundation 60-degree triangle

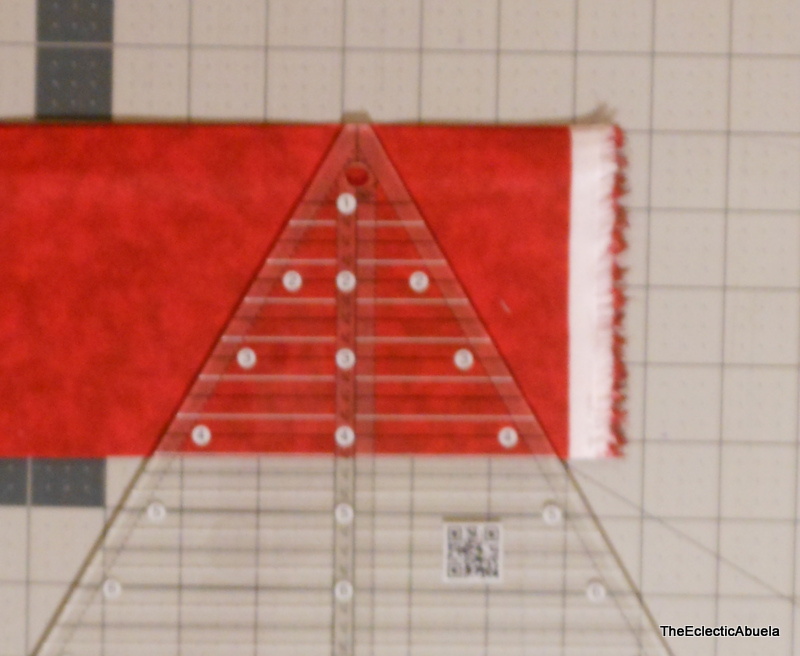
4.25" red triangle (sorry the picture is so fuzzy)

Pieced triangle (ignore the partial to the right)

I didn't get a picture of the step of gluing the triangle to the foundation, but you can see its placement here. After the triangle was secured, I simply string pieced the three areas around it.


When I had finished the pieces, I assembled it in rows.


This is when the stars and hexagons show up--you have to keep the faith through the piecing; they will eventually be there!


The edges of a triangle quilt are uneven. I didn't want to trim off all the piecing work to make them straight, so I pieced some half-triangle for the ends.

Now you can look at the piece on the right!
I did these half-triangles with neutral centers, so as not to distract from the star pattern. I also used a narrow (1.5") coping strip (border) at the top and bottom of the quilt, so I could manage my triangle points better for binding. I didn't want to lose them. 😉

You can see both the half-triangle ends and the coping strip here.


I had intended to use a pieced backing, but with the weight of all the strings on the front, I was afraid it would be too much. Instead, I chose this backing fabric both because of the color and the pattern--the hexagons echo those on the front.


All in all, this was a successful experiment, though I must admit that I am heartily sick of neutral strings for now!


Now, please, bring on the color!

I'm linking with Jo's Country Junction String Challenge Fiber Tuesday 167 at The Quilting Room with Mel, and Confessions of a Fabric Addict.