Showing posts with label Quilt Design. Show all posts

Sunday, July 29, 2018

Stars on Strings--An Original Design

This quilt began on graph paper. I have an EQ program, but I was defeated by triangles!

Stars on Strings--66" x 88"


I tried this more than once. My first experiment was to use regular, brightly-colored strings.


As you can see, the red stars are lost amidst the chaos!


I went to neutral strings which worked better to show off the stars.
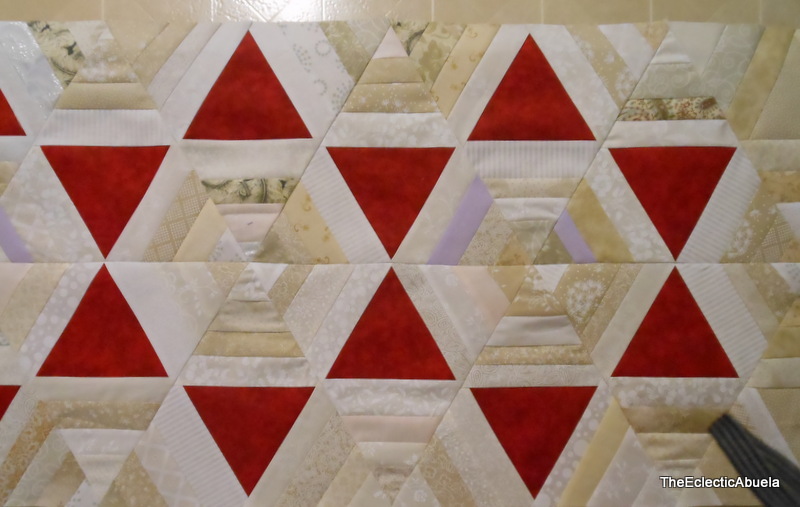
Please forgive the camera strap in the corner!

 I stayed with this idea, though, for me, it was hard--I always want MORE COLOR!


The making wasn't too hard, though 60 degree triangles can be tricky to assemble. It was simple string piecing for the blocks.

8.5" paper foundation 60-degree triangle

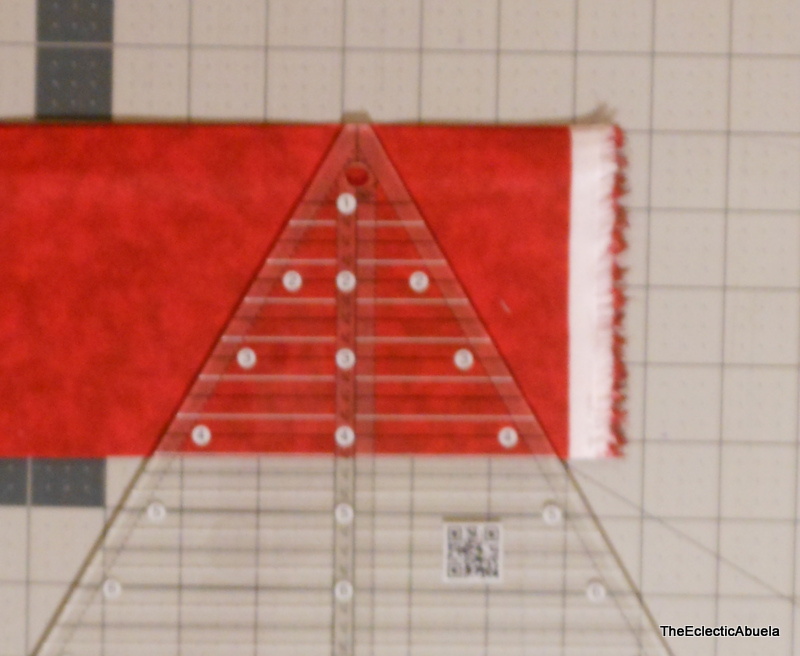
4.25" red triangle (sorry the picture is so fuzzy)

Pieced triangle (ignore the partial to the right)

I didn't get a picture of the step of gluing the triangle to the foundation, but you can see its placement here. After the triangle was secured, I simply string pieced the three areas around it.


When I had finished the pieces, I assembled it in rows.


This is when the stars and hexagons show up--you have to keep the faith through the piecing; they will eventually be there!


The edges of a triangle quilt are uneven. I didn't want to trim off all the piecing work to make them straight, so I pieced some half-triangle for the ends.

Now you can look at the piece on the right!
I did these half-triangles with neutral centers, so as not to distract from the star pattern. I also used a narrow (1.5") coping strip (border) at the top and bottom of the quilt, so I could manage my triangle points better for binding. I didn't want to lose them. 😉

You can see both the half-triangle ends and the coping strip here.


I had intended to use a pieced backing, but with the weight of all the strings on the front, I was afraid it would be too much. Instead, I chose this backing fabric both because of the color and the pattern--the hexagons echo those on the front.


All in all, this was a successful experiment, though I must admit that I am heartily sick of neutral strings for now!


Now, please, bring on the color!

I'm linking with Jo's Country Junction String Challenge,  Fiber Tuesday 167 at The Quilting Room with Mel, and Confessions of a Fabric Addict.


Thursday, June 21, 2018

Boxes of Strings--Variations on a Design

When I created the "Boxes of Strings" design, I was happy with my resulting quilt. Little did I know, however, that other quiltmakers would be interested in using the design as well.


I belong to the Quilting Board, a forum for quilters. When I posted the photo of my finished quilt and a tutorial about how I made it, another member asked if I would mind if forum members did a quilt-a-long with the design. I was thrilled! I knew I'd love to see variations, and this way, I wouldn't have to make several sample quilts myself.

The quilt-a-long thread begins HERE. The makers discussed and used various methods to create the blocks--it was fun to see several minds working on the project and coming up with the ways they chose to do it.

I asked them if I could show some of their progress (and finished quilts!) here, so you could see the results. Each photo links to the original on the Quilting Board.


 This beauty comes from Christine Y. in Hillsboro, OR. 
(Notice the feline Quilt Inspector is admiring Christine's work.)


Macybaby used her own technique to make these blocks--great for fabrics 
you'd rather not cut into strings.You can see how she did it HERE.

https://www.quiltingboard.com/quiltingboard-challenges-contests-f21/box-strings-quilt-along-t295603-6.html#post8039313


Tartan of Ontario, Canada, shows her in-progress version. She also used
an alternate way to put these blocks together. Check it out HERE.


Jane Reynolds of Orange County, CA, calls her version,
made from Kaffe Fassett fabrics, "KF Cubed."


Check out this version from Murphy 224--she calls it "Rainbow Boxes of Strings."
 What a great arrangement of color!

https://www.quiltingboard.com/quiltingboard-challenges-contests-f21/box-strings-quilt-along-t295603-9.html#post8079620


This wonderful example is from Gail Boothman of Smoky Lake, Alberta.

https://www.quiltingboard.com/quiltingboard-challenges-contests-f21/box-strings-quilt-along-t295603-6.html#post8047896


A link to the tutorial on the QB can be found HERE. A tutorial is also available HERE on the blog.

Thanks to all the quiltmakers who participated (and are still participating). I am truly honored that you used my design to create something beautiful of your own.

I'm linking with Whoop Whoop Friday at Confessions of a Fabric Addict, Whatever Wednesday at Jo's Country Junction and Fiber Tuesday 162 at The Quilting Room with Mel.

Wednesday, May 30, 2018

Busybusy May

Long time, no post! May is usually consumed with finishing up the semester, and this year was no exception. Add to that a shift change from days to nights in the household, and May has felt a bit topsy-turvy.

I have been working on projects--it just seems that I haven't finished anything, so I'll have a bunch of finishes at once one of these days.

I have been continuing my two-rail fence leader and ender project. This one is number ten for the year. I call it my Easter egg quilt--not because any part of it is egg-shaped but because of the colors.


I quilted it in a stairstep pattern. I've done several of the rail fence donation quilts this way, and I have to admit, I'm a bit tired of sewing three inches, turning ninety degrees, sewing three inches, turning ninety degrees,... 

I've been looking ahead to what I will do with leaders and enders next year. Bonnie Hunter begins her challenge in July, but in looking at what I have that needs to be done, I have settled on 3.5" squares. I've cut many scraps to this size through the years, and I think it is time to use them. I'm planning to do four-patches--neutral and scrappy prints. Since many of my quilts are donated, this seems a good choice. When non-quilting people think of quilts, a simple patchwork of squares usually comes to mind. Sometimes, simple is best.

I'm also working on a new string design. I'm still refining it--this one has taken some experimentation.

I began completely scrappy,


but I felt like the red stars were lost in the busyness. I'm trying neutral strings now,


but, this one feels kind of blah. I may try adding a few neutral prints for interest, but I have to be careful not to get too busy again. My quilts are normally about as calm as a riot, so I'll have to rein in my natural inclination! :)

So my busybusy May is nearly over--I'm hoping for a calmer June.

I'm linking with Whatever Wednesday at Jo's Country Junction.


Tuesday, October 24, 2017

Kaffe Fassett and QSTs

I combined large blocks of Kaffe Fassett fabrics with very subtle Quarter Square Triangles (QSTs) in this quilt for my stepdaughter. I didn't have a pattern for this one--I just made alternate blocks that I thought would be complementary to the prints.


The KF fabrics reminded me of vintage sheet prints.


Since the prints are quite bold, I toned them down a bit by using QSTs as alternate blocks.


The color difference is very subtle (almost too subtle, I think), but the QSTs are white and creme.


I used a small print for the backing and a purple blender for the binding. Many of the fabric prints contained some purple, so I think the color combination worked well.


The quilt finished at 82" x 82". I quilted it on my DSM with a simple meandering pattern.


I told my husband that the prints reminded me of vintage sheets. He said he had never thought of sheets as vintage before, but that he really liked the sheets we had on the bed now. I told him that since I got them new in the 1970s and have used them ever since, they certainly qualify as vintage!

I'm linking with Fiber Tuesday 133 at the Quilting Room with Mel.

Thursday, October 19, 2017

Birds and Fruit

I wanted to make a quilt for a friend, and I decided to use some panels I bought quite a long time ago with her in mind.


I rarely use panels, so I worked up a quick layout by measuring them and constructing alternate blocks in the same size.

The dark rectangles represent the panels.


The construction was easy, and soon I had a top.

Top before quilting


Luckily, I bought some fabric to match the panels when I originally got them--it was perfect for the centers of the alternate blocks, the backing, and the binding.


Backing and binding detail


After quilting, I gave it a wash, and now it is ready to go!

Birds and Fruit  66" x 74"


I think the panels look good surrounded by the very simple alternate blocks--I didn't want it to be too busy.

I enjoyed making this--it can be fun to design around a special fabric you want to use.

I'm linking with Fiber Tuesday 132 at The Quilting Room with Mel.


Wednesday, September 28, 2016

Bright Stars

I've been working on gift quilts for my youngest nephew and nieces. The quilts are now in their hands, so I can now share my work without spoiling the surprise.  


I didn't have a pattern for this one--I just made it up as I went along.


Her mom told me my niece likes bright, bold colors. I think the colors stand out well against the black and white background.


I created the stars based on 4.5" squares with an 8.5" square in the center. The background squares in black and white scrappy fabrics are also 4.5" squares. (These are all unfinished measurements--in the quilt they finish .5" smaller.)

I assembled this quilt in columns (vertical) rather than rows (horizontal). This way, I could work with complete star blocks; this made it easier for me to keep things in order.


Because I wanted to draw the colors of the stars out toward the edge, I made a border of four-patches with 2.5" squares.


I went with a simple black and white backing fabric and a black binding to tie the colors in the quilt together. The quilt finished at approximately 66" x 85".


I like the way this one turned out. Sometimes, you just have to experiment!

I'm linking to Busy Hands Quilts: Finished or Not Friday and Fiber Tuesday 80 at The Quilting Room with Mel.


Sunday, June 26, 2016

THIS is Why I Quilt

I sent "String Crossroads" to my granddaughter. This was the first quilt I designed from scratch, and I wanted her to have it to remember me (not that I'm going anywhere for a LONGLONGLONG time!) .

She loved looking at all the different fabrics that I included. The apple doesn't fall far from the tree--I remember spending hours looking at my maternal grandmother's and great-grandmother's quilts wondering "Who wore this fabric?" or "Where did this material come from?" Their work was an inspiration to me, though I didn't quite realize it at the time.


We never know what people will remember about us in years to come. I hope people remember about me, "She was a kind person, and she was a quilter."

I'm linking with Jo's Country Junction UFO Challenge.

Saturday, June 18, 2016

String Crossroads

I designed a quilt.

I always feel presumptuous when I think or say that, since this quilt is made of very traditional elements. However, I looked around online for quite a while, and I didn't see another just like it, so there it is--I designed a quilt.

This quilt takes elements of the traditional Arkansas Crossroads and combines it with my love of string blocks.


As you can see, I replaced the sixteen patch blocks with string blocks arranged in an X to mimic the shape in the crossroads blocks.


Here are some closer pictures (and you can see that I couldn't refrain from sticking in some fun fabrics!).


Chickens!


A jungle face and a hint of the Cardinals MLB fabric


A red onion (doesn't everyone need a quilt with an onion on it?)


Elephants (at least parts of them)


Another jungle face


I backed it with a beige and brown print, and I quilted it with an all-over meander. A bright red binding finished it off. The size is 82" x 98" (and it was a wrestling match to quilt one that large on my DSM [Domestic Sewing Machine]), but it was worth it to be able to say I did it all--from design to piecing to quilting to binding myself!


I'm hoping to write a pattern for this, but I've never done that before! We'll see how it turns out. I'll offer it for free here on the blog when/if I get it together.

Yes, I designed a quilt!


I'm linking with Jo's Country Junction UFO Challenge and Fiber Tuesday 65 at The Quilting Room with Mel.