Showing posts with label Stars. Show all posts

Tuesday, January 18, 2022

Embroidered Baby Quilt

 I was given some stamped quilt blocks to embroider, and I decided to make a baby quilt with them.

Really bad picture, sorry! 46" x 60"


There were twelve baby animal blocks . . .


. . . which I combined using sashing in between.


By adding triangles to the sashing ends and including cornerstones, I formed a star at each of the corners of the embroidered blocks.

I finished it with a striped binding.


The quilt went together quickly--the embroidery took longer than the construction!

It looks terribly wrinkled in these photos, but after washing, it is much smoother. I put this one away for a future gift.

Happy Quilting! 😺


Wednesday, September 2, 2020

Multi-Color Stars

 Another string quilt!


Multi-Colored Stars 78" x 78"


Multi-Colored Stars (detail)


Multi-Colored Stars (back and binding detail)


 It's a little crazy--I have another in the works that I think will show the secondary pattern to better effect.


.


Tuesday, June 2, 2020

Finally--Some Photos!

I am bad about putting off the photography of my quilts--and a blog post without pictures is a bit boring. I finally got some taken today--yay me!

Here is my version of Frolic--the Bonnie Hunter Mystery.

Frolic 88" x 88"

Frolic (detail)--I wanted to add Kermit the Frog because of a funny segment on Sesame Street that ended, "Everybody Frolic!"

Frolic (detail)--What's a busy scrap quilt without a Waldo to Find?

Frolic (border and backing detail)--Excuse the chalk lines; they will wash out.

Frolic (detail)--Cats, elephants, funny faces, and the Eiffel Tower

Frolic (detail)--Mary Poppins, more funny faces, and gooseneck desk lamps--there is a fabric for everything!

Next is a quilt made from some scraps from a friend. It is a Churn Dash/Greek Cross combination. I did this combo before (though not on-point)--you can see it HERE.

Dash/Cross 80" x 80"

Dash/Cross (border and binding detail)

Dash/Cross (block detail)


Finally, I have a couple of random pictures. First, some petunias.

These are red and yellow-gold, a combination I hadn't seen before. The yellow/gold shows up best when it is cloudy; the sun seems to change it to a whiter shade.

Second, a puzzle I finally finished--1000 pieces, and the words are tiny!


I've got several more quilts in progress; I'll share them when finished. Happy quilting!


Thursday, April 16, 2020

I'm doing Bonnie Hunter's Quilt Along entitled Unity. It is a medallion quilt with a new round added each week.

I have added round three this week. Tiny stars! 😺


This is a fun project, and I am really enjoying it. Thanks, Bonnie.

Sunday, July 29, 2018

Stars on Strings--An Original Design

This quilt began on graph paper. I have an EQ program, but I was defeated by triangles!

Stars on Strings--66" x 88"


I tried this more than once. My first experiment was to use regular, brightly-colored strings.


As you can see, the red stars are lost amidst the chaos!


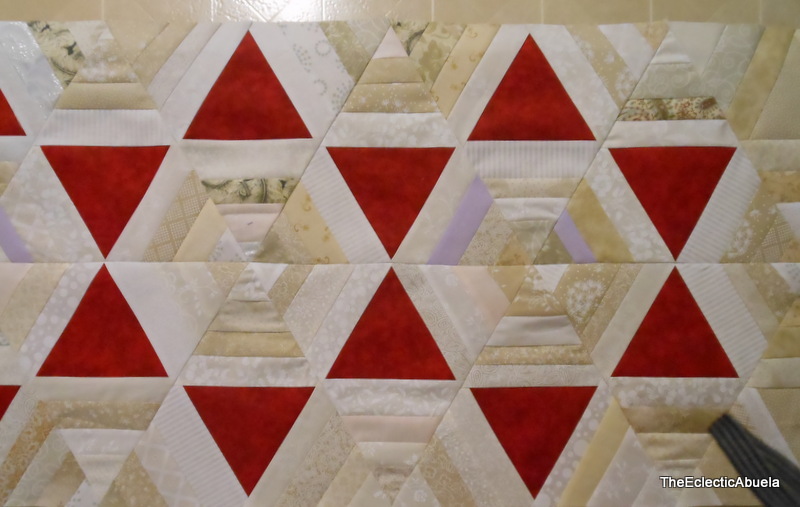
I went to neutral strings which worked better to show off the stars.

Please forgive the camera strap in the corner!

 I stayed with this idea, though, for me, it was hard--I always want MORE COLOR!


The making wasn't too hard, though 60 degree triangles can be tricky to assemble. It was simple string piecing for the blocks.

8.5" paper foundation 60-degree triangle

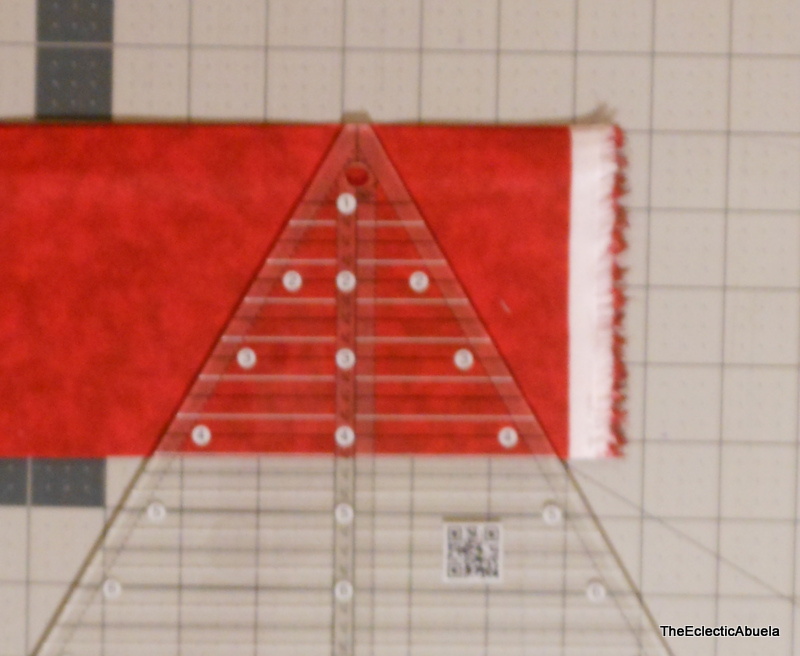
4.25" red triangle (sorry the picture is so fuzzy)

Pieced triangle (ignore the partial to the right)

I didn't get a picture of the step of gluing the triangle to the foundation, but you can see its placement here. After the triangle was secured, I simply string pieced the three areas around it.


When I had finished the pieces, I assembled it in rows.


This is when the stars and hexagons show up--you have to keep the faith through the piecing; they will eventually be there!


The edges of a triangle quilt are uneven. I didn't want to trim off all the piecing work to make them straight, so I pieced some half-triangle for the ends.

Now you can look at the piece on the right!
I did these half-triangles with neutral centers, so as not to distract from the star pattern. I also used a narrow (1.5") coping strip (border) at the top and bottom of the quilt, so I could manage my triangle points better for binding. I didn't want to lose them. 😉

You can see both the half-triangle ends and the coping strip here.


I had intended to use a pieced backing, but with the weight of all the strings on the front, I was afraid it would be too much. Instead, I chose this backing fabric both because of the color and the pattern--the hexagons echo those on the front.


All in all, this was a successful experiment, though I must admit that I am heartily sick of neutral strings for now!


Now, please, bring on the color!

I'm linking with Jo's Country Junction String Challenge Fiber Tuesday 167 at The Quilting Room with Mel, and Confessions of a Fabric Addict.


Wednesday, September 28, 2016

Bright Stars

I've been working on gift quilts for my youngest nephew and nieces. The quilts are now in their hands, so I can now share my work without spoiling the surprise.  


I didn't have a pattern for this one--I just made it up as I went along.


Her mom told me my niece likes bright, bold colors. I think the colors stand out well against the black and white background.


I created the stars based on 4.5" squares with an 8.5" square in the center. The background squares in black and white scrappy fabrics are also 4.5" squares. (These are all unfinished measurements--in the quilt they finish .5" smaller.)

I assembled this quilt in columns (vertical) rather than rows (horizontal). This way, I could work with complete star blocks; this made it easier for me to keep things in order.


Because I wanted to draw the colors of the stars out toward the edge, I made a border of four-patches with 2.5" squares.


I went with a simple black and white backing fabric and a black binding to tie the colors in the quilt together. The quilt finished at approximately 66" x 85".


I like the way this one turned out. Sometimes, you just have to experiment!

I'm linking to Busy Hands Quilts: Finished or Not Friday and Fiber Tuesday 80 at The Quilting Room with Mel.


Friday, February 26, 2016

Jamestown Landing--Part 4

Back to the landing--Jamestown Landing, that is.


I've got the top together now, but I haven't yet decided how I want to do the borders. Bonnie Hunter's has a narrow cream then a wider string-pieced border. I'm not sure if a red string-pieced border will overwhelm the top, so I'll do a bit of thinking and experimenting with it.


This has been a fun project so far, and I'm looking forward to the next step!


I'm linking to A Quilted Passion's "Whoomp, There It Is!" Linky Party.

Tuesday, January 26, 2016

Jamestown Landing--Part 3

I finally completed all the units for my Jamestown Landing quilt. Now I'm starting the assembly.


It is a complicated layout, so I'm going very slowly and comparing each piece with the instructions in the book, String Fling by Bonnie Hunter.


Up close, I didn't feel like the overall pattern was showing up, but when I took photographs, I saw it clearly. Sometimes you have to step back to see it better!


Lots (and lots!) of pieces to go, but so far, I am very pleased with it.


Previous posts about this quilt can be found HERE (Part 1) and HERE (Part 2).


I am linking with Fiber Tuesday 44 at The Sewing Room with Mel.